The First Step to Recovery is Admitting You Have a Problem
Problem: we keep forgetting to update the blog. Recovery Progress: it’s only been 9 days. WE ARE IMPROVING. The issue here is that A LOT has happened since we redesigned our box. We started the building process!
While waiting for the patch heater to arrive, we started cutting out insulation boards based on the Solidworks design. We decided that initially, we will only be building the hot side of the box. The insulation that we acquired for free were all 48 inches long but their widths varied anywhere from 4 inches to 29 inches. This made things difficult as the panels (top, bottom, sides, and back) required several pieces of insulation puzzled together to the right dimensions. It took us several days to get all of the pieces needed, but alas, all 49 pieces were cut. One of the biggest problems that we faced had to do with the design of the box itself. in the design there is an insertion slot for the specimen, a crucial element to keep it air tight. The machines in the machine shop were not suitable to cut these small corners off of the pieces of insulation. But Michael had the idea of using a hot knife. Dr. Kobus went to go pick one up from Sears and we were back in business! Just kidding. The knife did not work. the blade was too short to be useful in our application. Leanna went to the machine shop, filed down a threaded rod until it was flat (like a knife!) and attempted to use this as the new blade. But then we found that the problem was that the heat on the hot knife could only travel about an inch down the blade, leaving the tip cool. Leanna has another strange idea and well, it looks like this.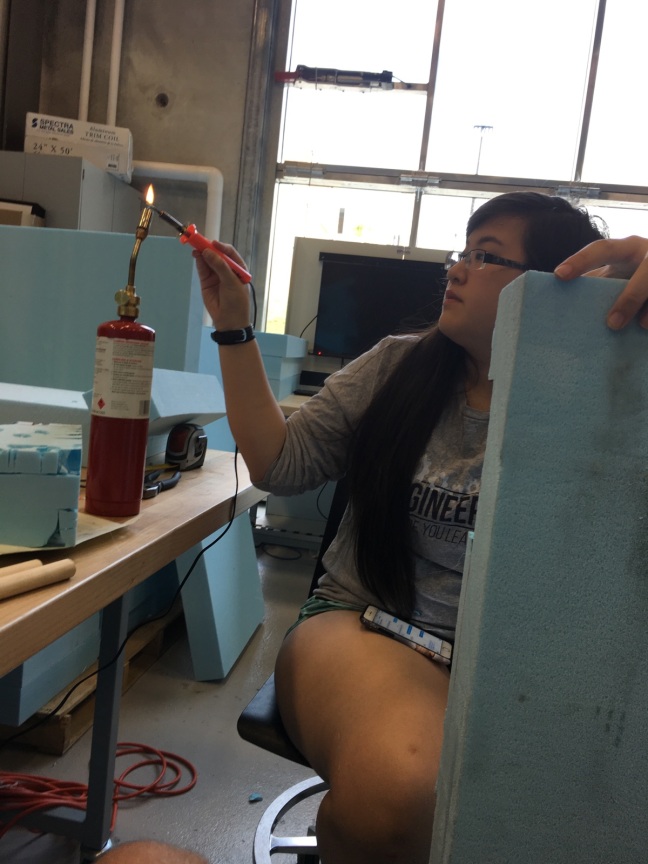
Using the propane torch, she heated the make-shift blade on the hot knife and cut the insertion out of the insulation (Hurray!).
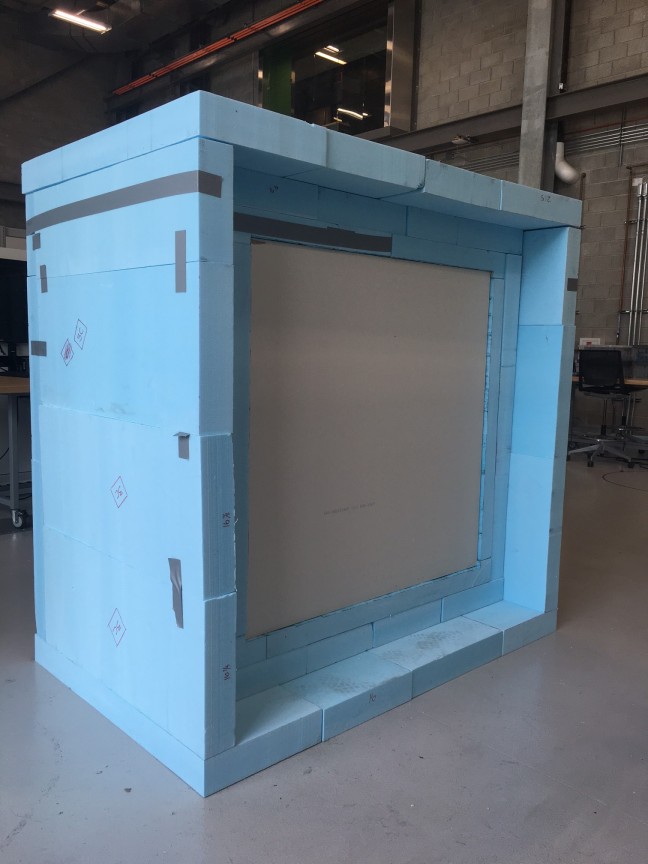
We were advised by Dr. Kobus not to use glue when putting together our box just yet. He told us to place the pieces where they needed to go and then use ratchet scraps to compress the pieces together. We did as told with a few minor difficulties. Once the box was complete, we squeezed the sample into place and the completed half-box is shown in the featured picture.
With the box in the correct configuration, we had to make thermocouples for each side of the specimen. With some time and patience, we were able to make 6 thermocouples. Three on each side of the specimen. We are currently trying to figure out the best way to implement the heat source into the box. We were provided a heat gun from Matt, the lab manager, but the heat gun may be too hot, in which case, we would need to hook it up to a variac to lower the power output, therefore producing less heat.
